Friday, July 9, 2021

Blackboard: How do I view the client side (browser) SCORM Engine log and debug data?

When you play a SCORM course, there's a lot happening behind the scenes.  And a lot of information is available in the debug log.  You might never need to see it, but it may help troubleshoot.

Blackboard's Rustici SCORM engine gives you the ability to control Debugger Options. See https://help.blackboard.com/Learn/Instructor/Original/Course_Content/Create_Content/Add_Content_Packages#edit-the-scorm-player-advanced-options_OTP-4 for details.

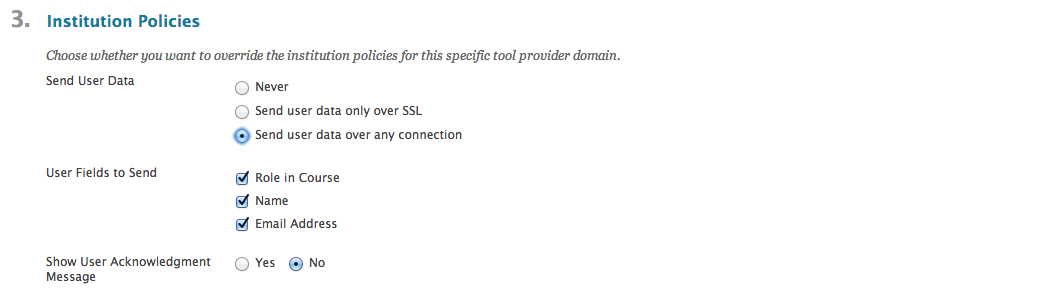
Here's a screenshot of the Debugger Options:

SCORM player advanced options

However, Blackboard doesn't mention HOW to get to the debug log.

Wouldn't it be nice if there was a View Debug button that displayed the debug log?  Like it does on the Rustici SCORM cloud.


Debug log opened in Rustici SCORM cloud


Blackboard seems to have hidden the View Debug button on the player's Navigation bar by default, but even when I reveal it, clicking on the button doesn't work.

On https://support.scorm.com/hc/en-us/articles/206163696-Accessing-Debug-Logs-in-SCORM-Cloud Rustici actually mentions a "super sneaky way" to access the log.


You can:

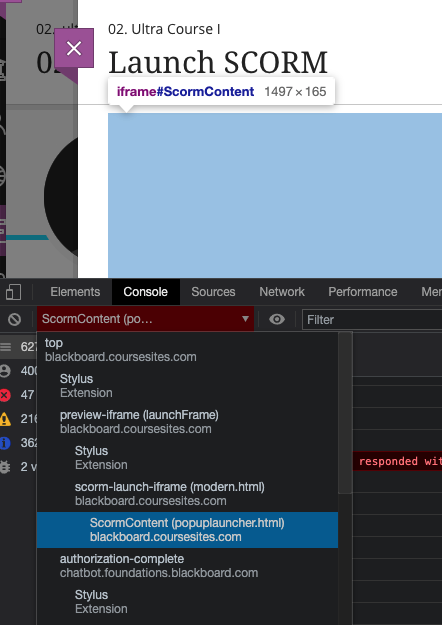
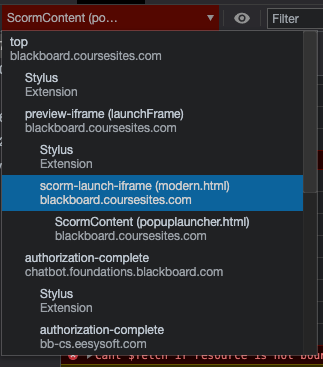
1) open the browser dev tools console

2) make sure the frame it’s referencing is the one that contains the player page (not the content)

If the courseware is launched in a secondary window, click back in the main frame of the initial window (behind the courseware popup window) – this will likely say “We launched your course in a new window...” or similar.

3) Type Debug.ShowAllAvailableData() and hit Enter. 


Browser developer console opened


This should bring up the window.

Note: be sure your browser allows pop-up windows from the site.


Rustici Engine Log window

Does it work on all browsers?

I've tested on Safari 14, Chrome 91, Firefox 89.

Note: be sure your browser allows pop-up windows from the site.


How to open developer tools?


What about in Ultra Base Navigation (UBN)?

It does work, but you have to watch out where you invoke Debug.

In my testing on coursesites.com, I noticed that the Console would default to ScormContent (popup-launcher.html) - the Debug does not work there.

Console showing ScormContent (popuplauncher.html)

I needed to use the pulldown and select "scorm-launch-iframe (modern.html)", then I could use the Debug.

In Console, select modern.html


Happy SCORM Debugging!

Sunday, March 22, 2020

MS Teams for Blackboard


Microsoft has created an application that allows instructors to create a Teams meeting and share that with their students. Blackboard has turned that application into an LTI Advantage tool that can be integrated with Learn. Blackboard's integration allows users to launch Microsoft Teams Meetings directly within any Learn course.

What is it?

This sentence summarizes it pretty succintly:

“We’ve enabled institutions with Microsoft Office 365 to create, schedule, and launch Microsoft Teams conference calls within Blackboard Learn. “
(from https://blog.blackboard.com/supporting-continuity-of-education-with-blackboard-learn-and-microsoft-teams/)


Requirements:


The Microsoft Teams for Blackboard integration is available in any Blackboard Learn course. Your institution needs to meet these requirements to use Microsoft Teams for Blackboard:

  • Blackboard Learn SaaS or Blackboard Learn 9.1 Q2 2019/3700, released in May 2019, or later.
  • LTI must be enabled for use in courses: Admin panel > LTI Tool Providers > Manage Global Properties. Enable LTI for course use and optionally for organization use. Select Submit.
  • Set up LTI 1.3 Tool
  • Set up REST API
And maybe one, taken for granted, you (the creator of the meeting) need to have access O365/Teams!  If you don't have Teams, this won't give it to you.

Participants DO NOT have to be in Teams to join the meeting.


Administrator Setup:


Overall, if you meet the requirements, it's pretty easy to set up following their instructions at https://help.blackboard.com/Learn/Administrator/SaaS/Integrations/Microsoft_Teams


Instructor / Student facing documentation:

  • https://help.blackboard.com/Learn/Instructor/Interact/Microsoft_Teams
  • https://help.blackboard.com/Learn/Student/Interact/Microsoft_Teams


Blackboard Learn Caveats:

  • Your meeting appears in the first Content Area of your course based on the Course Menu sequence and in your Calendar.

Example: if Information is the first Content Area, the content link will (by default) appear there. You can move it to a more appropriate Content Area.


  • The integration sets adaptive release on the item based on the start and end date/times.

Example: Date Restrictions: Display after Mar 20, 2020 7:00:00 PM, Display until Mar 20, 2020 9:00:00 PM


MS Teams Caveats:
  • The meeting becomes a Chat once you start the meeting (not when you create the meeting)
  • Participants may not have access to the Chat artifacts (files, recordings, etc) unless you add them as Teams participants.
  • As participants do not have to be in Teams, that may be more difficult to manage post-meeting
  • Since the meeting only appears in Chat you will wants to name your meeting something easy to find (you can pin it later)
  • Suggest maybe create ONE meeting for the entire semester (set broad start/end date/times) so you only have to deal with one Chat on the Teams-side
  • You may want to check with your O365 Tenant Admin as to any Chat policies (e.g., when does it get removed).


What's the difference between a Chat and a Team Channel?


From https://kb.wisc.edu/92160
Chats are typically for one-on-one or less-important group messages. 
If you wanted to ask one person or a specific group of people a question, you would create a chat. 
In general, more short-term or day-to-day conversations should go through the chat/group function rather than the team function.

Can you convert a Chat into a Team Channel?

No, but there's a suggestion you can upvote:  
https://microsoftteams.uservoice.com/forums/555103-public/suggestions/19440163-allow-group-chats-to-be-converted-into-a-team-chan 

3/24/20 Is it available on CourseSites?

Yes! 

Thursday, June 21, 2018

REST API "User"

More Blackboard vendors are moving away from native Building Blocks and WebServices to LTI and REST API.

However, the vendor can just casually ask to set up a REST API user with "administrator" privileges.

We had one REST API integration for a pilot project, where most REST API calls could be accomplished by having the REST API User an "instructor" in the course.

However, there was one REST API call that needed higher privileges.


So how we did it:

I. Find out what API call(s) need higher privileges
Vendor needed to get a particular user's course memberships.

API: /learn/api/public/v1/users/{userId}/courses


II. Determine what custom privileges necessary for the REST API call(s) 
I looked up the API call (on developer.blackboard.com)

Users can always view their own memberships. Callers viewing the memberships of another user require at least one of the following entitlements:
'system.user.course.enrollment.VIEW' allows callers to see course memberships
'system.user.org.enrollment.VIEW' allows callers to see organization memberships


Note: this is also a good time to verify that your version of Blackboard meets the minimum version to support  this particular REST API call!

III. Set up a custom privilege role set so we can assign privileges the REST API call(s) require


We have Community license, and prior experience with custom privs for school-level domain administrators. We'd already had a privilege set for these school-level domain admins to see all users.

DOMAIN_USERS Custom Privileges:

  • Administrator Panel (Users) > Users 
  • Administrator Panel (Users) > Users > Edit > View Course Enrollments 
  • Administrator Panel (Users) > Users > Edit > View Organization Enrollments 

IV. Set up (Community license) Domain for that vendor's user so we can assign custom privilege role set to it, and control scope (if necessary) 

We set up a Domain for the vendor: APP_REST_API_VENDORNAME

With Collection:

  • Users > Collection Options: Include all items 
Note: we could do a little more lock down if necessary (if there's a way to craft a course/user collection to be more targeted) ; but since this was a pilot and the REST API User was associated directly with the pilot course(s) we didn't need to do more.

V. Add REST API User as Domain Administrator w/ the custom privilege role set 

I added the REST_API_USER as domain administrator to APP_REST_API_VENDORNAME with our existing DOMAIN_USERS Custom Privileges.

VI. Test
  • Test the REST API Call(s) as the REST API User.
  • Get vendor confirmation they could make REST API call(s), and it was sufficient for their needs. 


Tuesday, April 11, 2017

Self and Peer Assessment not assigning any users to evaluate

We've encountered a few cases where the self and peer evaluation does not seem to give the students anyone to evaluate after they do their submission.

It's not affecting all courses.

After some insight from Blackboard about where this tool stores data, we did have a breakthrough.

It turns out this tool stores pretty much everything in the file system, not in the database.

To find it, you will need to know the COURSEID and the CONTENTPK1 related to the Self and Peer Assessment. Technically you don't need a database query to do it, just mouse over the assessment and look for the content= bit.

The Self and Peer Assessment tool will then store information in

 content\vi\BBLEARNorBB60\courses\1\COURSEID\content\_CONTENTPK1_1_act

This folder will contain sub-folders, and there are two that were important to us

  • submissions - all the student submissions go here into USERPK1_1 folders 
  • marking - where the evals are stored 

In this case, there's a very special file in marking called marking.txt that assigns evals to the individual students, e.g., if you have two evals per student, there should be one record for each student with two other students to eval.

The marking.txt file gets generated once, apparently at the Submission End Date and NOT at the Evaluation Start Date.

The problem occurs when the Submission End Date is extended after the original date has passed. The marking.txt doesn't get re-generated at the new Submission End Date.

Thus, any students who submitted during the extension period are not counted in the marking.txt, and those students will have no one to evaluate.

You can check this by looking at the date of the marking.txt, and then checking the dates on the submissions folder for that particular user pk1.  If the user has submitted after the marking.txt was created, they are out of luck.

The workaround we came up with:

1) delete the original marking\marking.txt related to the assessment

2) re-trigger the evaluation process via Course Tools > Self and Peer Assessment > assessment name > View Evaluations

This should generate a new marking.txt which should now contain all submitters to date.

IMHO, this should only be done PRIOR to Evaluation period because you are telling Bb to re-assign evaluations.  I doubt you'd want to do this after evals have started, and some have already evaluated...
----
Addendum: the marking.txt can get prematurely generated if the instructor loads the "View Evaluations" page at any point during the submission period. It will create the marking.txt file and populate with whomever has submitted up to that point (Thanks Tim @ UBC)

Friday, August 14, 2015

Reverse Engineering the Raw Results of a Multiple Answer Question

I had occasion recently to obtain assessment results out of a recovered database.  One question type that was a bit puzzling was the Multiple Answer where the Answers were randomized to the student.

Say I created a question:

When the student took the test, the answers were randomized, e.g.,


When I extracted the results, I got a data string like


Useful bits:
  • answer_order: 0, 3, 4, 1, 2 (the order answers were displayed to the student); note: the ordinal position is 0.
  • sequence of response_values (the actual selections)
  • score_value: 0.0 (what the student auto-scored)
Question: 

Does the sequence of response_values corresponded to the original order of answers in the question, or the order of answers displayed to the student?

Answer:

It is corresponds to the original order of answers in the question.

Deeper...

The question had five answers
  • 3 - position 0
  • 4 - position 1
  • 5 - position 2
  • 6 - position 3
  • 9 - position 4
The question was displayed to the student
  • a. 3 = position 0
  • b. 6 = position 3
  • c. 9 = position 4
  • d. 4 = position 1
  • e. 5 = position 2
That corresponds to the answer order


The student selected a. 3, b. 6, c. 9

That corresponds to the sequence


and so on.

Finally, the student received a score of 0 (in my example, they had to get all the multiple answers correct, no partial credit)


Wednesday, September 17, 2014

pushconfig without starting tomcat services

Saw this question on BBADMIN-L mailing list which had a useful tip from the community:

Does anyone know if it's possible to run a pushconfig but not start the tomcat processes? I need to do several patches that require a pushconfig but I don't want to wait for the servers to startup and shutdown.

Answers

Nick (MSJC): Sure in the pushconfigupdates.bat\sh and pushconfigupdates.bat\sh.bb files just comment out the line that calls services.start. 


Miroslav (CSU Chico): Yes. You just need to comment out the starting part out of the script. We do this regularly after each release pack upgrade. Simply edit pushconfig and comment out the part that tells it to start the app node. We also usually change the text so it says NOT STARTING at the end.
This needs to be an option when upgrading as well. We pretty much never want the system to start up immediately after upgrade finishes.

Friday, August 15, 2014

IMS LTI Launch Test

IMS LTI Launch Test


The prior IMS LTI test site I was using (see my older blog post) no longer seemed to work.

I found a new one thanks to the JISC-funded ceLTIc (http://www.celtic-project.org/)

There are two ways you can use IMS LTI in Blackboard:

  • Using Oscelot Basic LTI tool
  • Using Blackboard's IMS LTI Tool Provider

I've included both ways to add the IMS LTI tool.

I. Using Oscelot Basic LTI tool

1. Install and configure Oscelot Basic LTI 

 2. Register New Tool

  1. Go to System Administration tab
  2. then  Basic LTI tools (under the Tools section)
  3. click on Register New Tool
  4. Enter
    • Name: IMS LTI Launch Test
    • Launch URL: http://ltiapps.net/test/tp.php
    • Consumer Key: jisc.ac.uk
    • Shared Secret: secret 
  5. Submit
Should look like

After Register New Tool


3. Edit Data Settings for this new tool

  1. Select Edit data settings (pull-down) for this new toolname
  2. Enter
    • Context ID: Check
    • Value to use for Context ID: Database key (default)
    • Context sourceId: Check
    • Context Title: Check
    • User ID: Required by tool
    • Value to use for user ID: Batch UID (default)
    • SourceId: Check
    • User name: Required by tool
    • Email: Required by tool
    • Role Mappings:
      • Instructor to Instructor
      • Student to Learner
      • Teaching Assistant to Instructor (or Teaching Assistant)
  3. Submit
Should look like: 
After Data Settings

4. Edit Launch Settings for this new tool

  1. Select Edit launch settings (pull-down) for this new toolname
  2. Enter
    • Open tool in: select New window
  3. Submit
Should look like:

5. Enable the tool and configure how to display it

  1. Pulldown by toolname, choose Enable
  2. Pulldown by toolname, choose Add as course tool
  3. Checkbox the toolname, choose Display on Menu: Tools
After enabling the tool and configuring of Display on Menu

II. Using Blackboard's IMS LTI Tool Provider


Blackboard has had Basic LTI support since 9.1SP4.

1. Register Provider Domain

  1. Go to System Administration tab
  2. then Building Blocks
  3. then LTI Tool Providers
  4. Click on Register Provider Domain
  5. Enter
    • Provider domain: ltiapps.net
    • Provider Domain Status: Approved
    • Default Configuration: Set separately for each link
    • Send User Data: Send user data only over any connection (note: I'd prefer over SSL)
      • User Fields To Send
      • Role in Course: check
      • Name: check
      • Email Address: check
  6. Submit
Should look like


After Provider is Registered


3. Set up Tool Placement

  1. Click on the '0' under Placements for the row of the provider (ltiapps.net)
  2. Create Placement
  3. Enter
    • Label: IMS LTI Launch Test
    • Handle: imsltilaunchtest
    • Type: Student Tool (for simplicity)
    • Tool Provider URL: http://ltiapps.net/test/tp.php
    • Tool Provider Key: jisc.ac.uk
    • Tool Provider Secret: secret
  4. Submit
Should look like:
After Placement Created


III. Now that LTI is set up we can use it in a course


1. Add tool to your course

  1. Go into your course as an Instructor
  2. Go into a content area/folder
  3. Under Tools menu, you should see the new toolname (e.g., IMS LTI Launch Test)
  4. Select the new toolname
  5. Submit
Adding LTI (e.g., IMS LTI Launch Test)  to the Course
After LTI (e.g., IMS LTI Launch Test) added to Course


2. Test the tool (as instructor, as student)

Note: beware browser security measures, e.g., pop-up blocking, content blocking (since we're loading an insecure page)
  1. Click on the toolname link you added
    • If you are using the Oscelot Basic-LTI : It should open a new window
    • If you are using the Bb LTI Tool Provider : It should open in the lower frame (yeah, no choice to open in a new window)
  2. The http://ltiapps.net/test/tp.php should load and display various POST parameters
Oscelot Basic-LTI Launch should look like:
Bb LTI Tool Provider Launch should look like: